Pages

When you make a conscious choice to be happy, no one can take it away from you because no one gave it to you: you gave it to yourself.

A quote from April Green's - Bloom For Yourself Journal

Monday, 14 December 2015

A sneaky peek!

Hello!

Just a quick post to share a few pics of items that I've been loading up to our online shop. It hasn't gone live yet but you can follow all the news and be the first to know when we are live over on our Facebook page - Creative Together

Here's a few of the items I'm adding  - 


That's it for now!
Take care Zo xx

Wednesday, 9 December 2015

WOYWW 340 - Wobblers!

Happy Desk sharing day! Otherwise known as WOYWW lead by our wonderful leader Julia!

As always I'm here to share my desk but first I'd like to say I have some exciting news and an update on Keagan on my post from earlier in the week. I know many of you would want to know/see this so I thought I'd say!
Right back to the desk - 

 So right side has a Christmas Wobbler sheet I've not made up yet.
 The window side sees cards left to dry over night.
I really love these wobblers such fun. 

I announced on other social media that I'm not sending Christmas cards this year as I have decided to make a donation instead to my charity fundraising. However I have made these for close family. 

I will pop for a visit before next Wedsnesday!
Take care Zo x

Monday, 7 December 2015

Exciting News & catch up

Good Monday to you!

I'm back to share some exciting news with you all. In a few weeks myself and my best friend Lisa (Lisa came to WOYWW crops with me) will be launching our very own website/shop. It's called - 


I'm busy working on the site (I designed the banner above too) and it hasn't published yet, however I have set up a Facebook page where you can keep up with news & updates and see photos of the kind of projects we will be selling in our shop. Here's the link - 


I would love it if you all popped over and liked!

Proceeds from the items I sell will be donated to BANES Young Carers this charity helps so many young carers in our area including my boy, Keagan. My items will include Book Art and decorated notebooks.

Lisa is a qualified Florist so as well as papercrafting projects she will also sell floral items such as buttonholes, corsages and hairbands for example.  

We have been friends since playschool (nearly 38 yrs now!) and we both have always loved craft/art. Over the years we've attended craft fairs together and have always shared ideas and techniques hence the name - Creative Together! 

On a personal note, I visited Keagan this weekend. As you know if you visit me regularly, Keagan is attending the British Racing School in Newmarket to start his career in horse racing. I'm happy to say he is settled, looks well and is enjoying his time there. Here's pic I took - 

So that's my news and update.
Take care Zo xx


Friday, 4 December 2015

Friday smiles

Good morning! I'm here today to share my Friday smiles and join up with Annie and the rest.

My smile is huge today. All because I am visiting my son, Keagan, this weekend!!!!! He has now been away 5 weeks and it's the longest we have ever gone without seeing each other. It's been so hard, but made a bit easier as I know he is happy and chasing his dream.

My bestie is coming to look after Baxter too. I'll leave you with some of the photos I sent Keagan this week of Baxter and of my Christmas tree!!

 Those who know me won't be surprised that it is blue and white/silver!
 Baxter snoozing next to me.
Here Baxter was waiting to see if I would give him a bit of my ice lolly!!

Take care Zo xx

Friday, 27 November 2015

Friday smiles 147 - colouring and new hair!

Hello all you lovely Friday people. I'm back to share my smiles linking up with Annie for week 147!

So after last week where I struggled with my conditions, this week has been much better. I've seen my friends (had to cancel plans last week) inc going to teach art/colouring to my friend's children who are homeschooled. I had my hair cut and have dyed it. I'm seeing another friend today and we are talking craft!

I also managed to complete November Kit and Clowders Create & Learn class. Here's the pics - 

 So my hair is now very red - believe me it's much redder than this pic shows!
 The cut is an asymetrical long pixie cut!! Longer one side with longer layers from the top while other side is cut short above my ear and the back is short too. Very easy for me to manage.
 Here's a before pic - hair was very long and untidy. The style had grown out. You can see the colour better. I took this the morning after it was dyed.

This is my complete November class finished. Am so happy with this. 


What are you smiling about today?
Take care Zo xx

Wednesday, 25 November 2015

WOYWW 338

Hello desk friends and others.

I'm back to link up with Julia and all the desk dashers to share our desk.

Here's mine today - 
 So the right side is a bit of mess. I've just signed up to a monthly class with Kit and Clowder. So of course I've got a folder to put the theory stuff and my work as I go. Pens out everywhere!

 The window side is tidier. There's a WIP book art going on, then my pile of Spectrum Noir pencil tins and then my colouring books. I recently bought one that cost me £9.99. BUT...Tesco has started selling them.
 I bought this Animal one from Tesco for £4.
And this Lost Ocean one for £6. That's over half price each. Happy Zoe.
I do love these - the foiling makes them 'posh colouring books' as my mum called them!!

Keagan Update - he had a rough week last week as he had a fall and injured his ankle, thankfully a day's rest with ice pack sorted it out and he was back riding sooner rather than later. Then he got bit! Those horses are powerful. The bite went right through and broke the skin. Keagan says it was swollen and bruised. But I know it's better now. I spoke to him last night and he's had a few really good days riding. He is enjoying riding the bigger horses which are a challenge. But he's loving it! 
He's so happy, you can hear it in his voice. While it is long days and hard work he's coping with it all. Washing being done regularly and he's had no problems getting up at 5.15am each day ready to be in the yard for 6am! Am looking forward to seeing him when I visit in a couple of weeks.

Will get round to see you all by next Wedsnesday!! 
Take care Zo xx

Saturday, 21 November 2015

A Christmas Colouring tutorial - red.

Happy Saturday! Today I'm going to share a simple tutorial to show how to colour red. It can be a tricky colour to do. Before I start I must point you all towards Alyce at Kit and Clowder I've learned so much from taking Alyce's classes. I've coloured for years but Alyce helped me to further my colouring, showing me how to add more depth and detail.

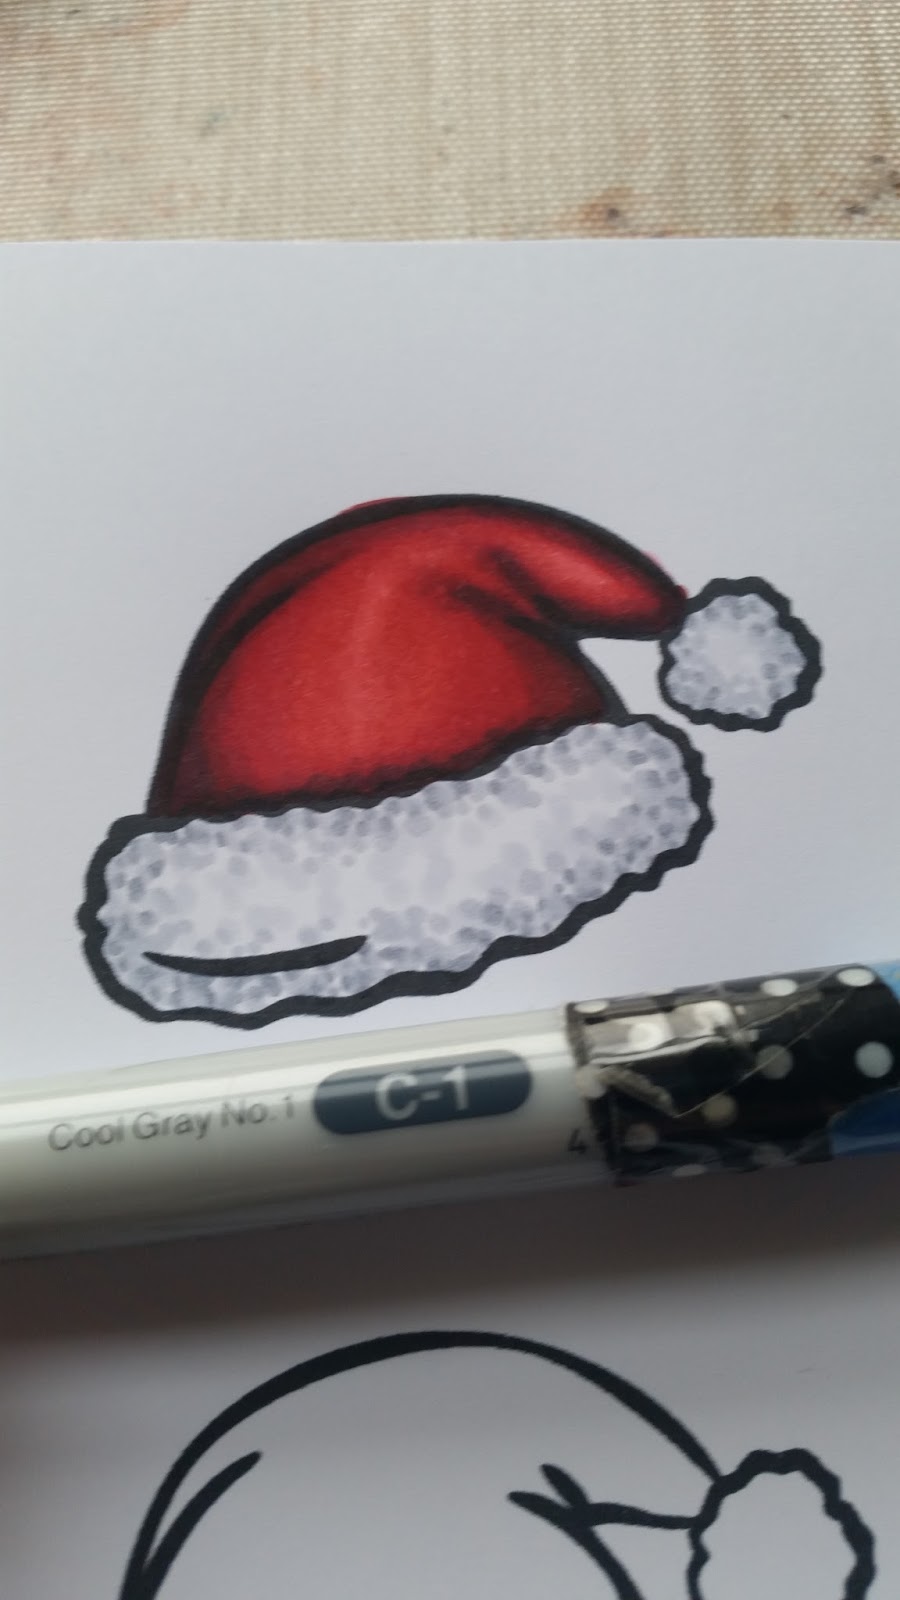
I found a free clipart image of a santa hat to do this tutorial - 

 So these are the reds - using Copics.
 I start by putting the darkest red. I want the hat to appear round. So putting the darkest in these areas will help to create this look. It'll make more sense at the end!

 I add the medium red going over the darkest and bringing this red further into the hat.
Then I use the lighter red to blend over the top of these colours leaving a white area where I want the hat to be the lightest.

This first layer is mapping out the areas of light and dark. I didn't even use all of my reds I just chose the dark, medium and light for this mapping layer.
Now the next layer - 
 
 I use the 2nd darkest red bringing it much further into the hat. The problem with red is that if you use more of the lightest it can appear pinker than you want.
 I used the medium red to blend this again leaving a small white area.
The lightest red I just used to blend into the white I didn't go over any of the dark areas this time as I didn't want to desaturate the red.

Okay so the hat looks good but I want to add more depth so I use a dark grey. Greys are fabulous for adding to any colour. If you choose a grey that is slightly darker than your darkest colour it will blend  nicely.
 I chose C7 and added it only to the very darkest areas being quite precise to only add it to the areas that will enhance shape.
As before I worked through my reds to blend the grey out. I'm left with a nice red hat that has depth and shape.

So now I want to create a fluffly bobble and trim.
To do this I use my greys & blender.

 So I use dots, don't press too hard as you want small dots. Adding the darkest grey first I go around the edge.
 I go over the darkest with the medium grey. Creating dots of different sizes working further into the trim and bobble.
 The lightest grey covers the other 2 blending. However I try not to blend every dot as I need the different tones to create shape.
 I use my blender to smooth out the lightest areas. As you can see the trim and bobble now look fluffy and have shape.
I usually add some sparkle too!! 

The ideas here work with any colour. If you map our your image using a dark, medium and light you will create shape. By adding further layers and depth creates an image that looks more 3D.

Hope this helps. I will be back with further ideas. 
Take care Zo xx