Pages

When you make a conscious choice to be happy, no one can take it away from you because no one gave it to you: you gave it to yourself.

A quote from April Green's - Bloom For Yourself Journal

Friday, 10 February 2012

My Dad's Card

Well we woke to a winter wonderland as a few cms of snow had fallen over night - nothing major though, all roads clear, but the fields etc do look pretty.

Right for those of you who visited my desk for WOYWW you would've seen the beginnings of this card. My first idea didn't work out as I hoped so I changed plans and went with this instead.

You'll see it's a combination of Sheena Douglas stamps. I masked the poppies from the paint fusion range to then stamp the cottage from the sketchy collection and coloured with my Spectrum Noir pens. My dad is an artist so I know he loves this type of image and I know he loves my interpretation of them.


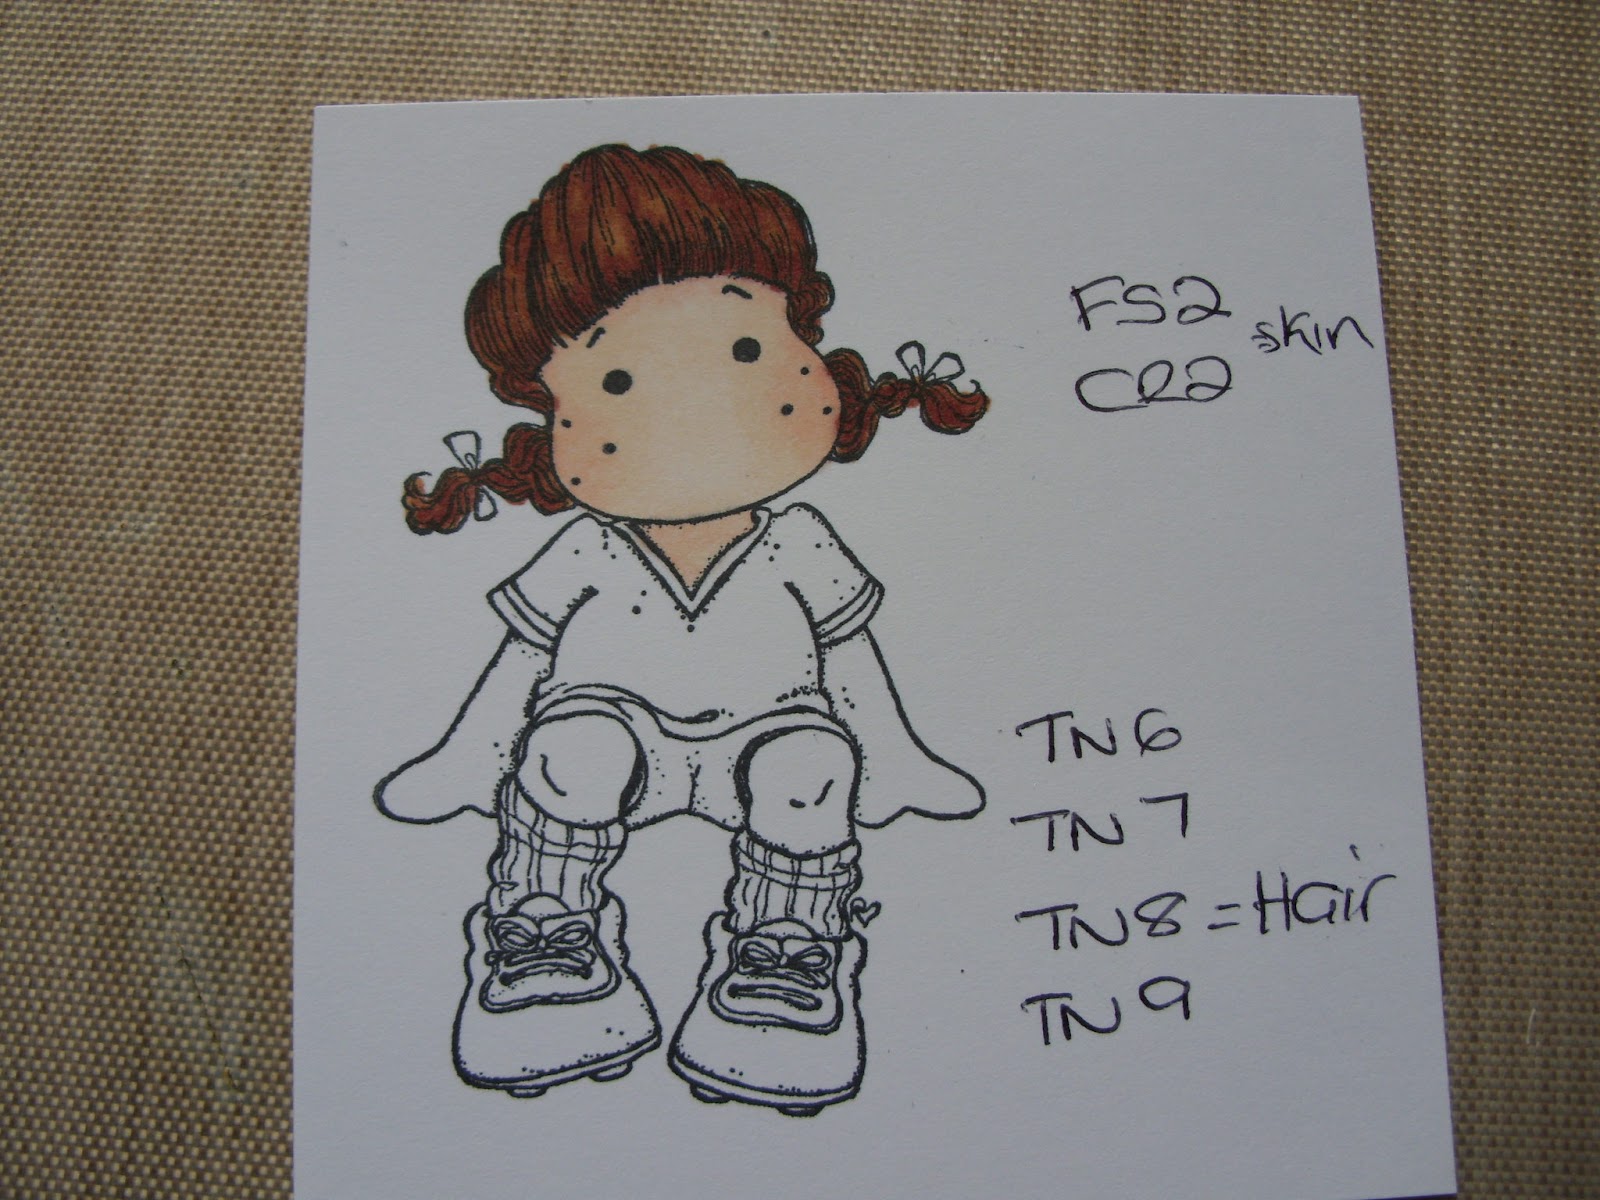
So here's the image mid way.


Then here's the finished card and a few close ups.


The card is based on Centura Pearl, the matting  & layering is done with Coredinations card. The background is stamped with a text stamp from Creative Expressions. A couple of buttons and a bit of ribbon and bakers twine finish it all off! I was brave and hand wrote the sentiment in white down the side. Not something I would normally do but I wanted it to say Dad, Happy 60th Birthday without being a huge impact on the card.

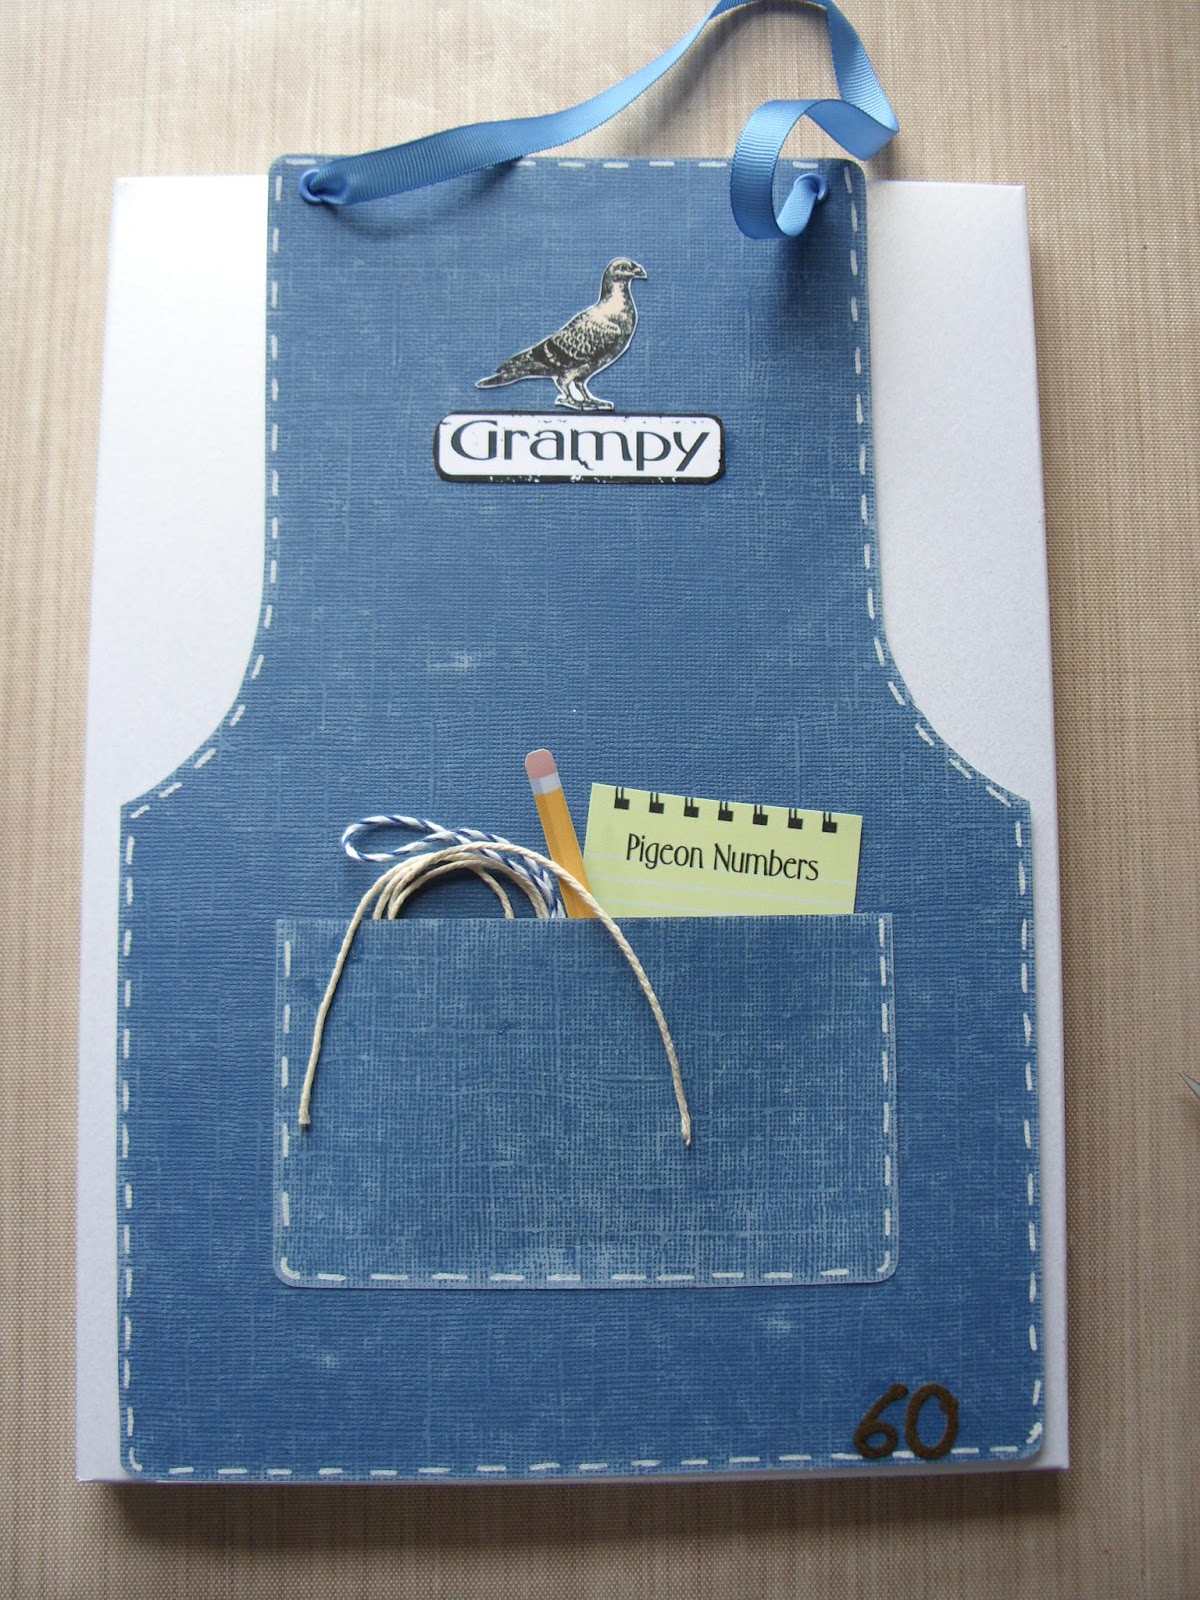
I also thought I'd share the apron card I've made for my son to give his Grampy. They are pigeon fanciers who race the birds all over the country and abroad so thought this was a good idea and something different.

More Centura card for the base which I cut into an apron shape then I used Coredinations card which I distressed by sanding. I made the pocket and printed the note and pencil from a MCS CD, then added string and twine. I drew the white stitching on and popped the 60 and Grampy on too.

Both cards will be given in enveloboxes I've made on my envelobox board, using... yes you guessed it, more Centura pearl card!

Take care & stay warm. Zo xx

Wednesday, 8 February 2012

WOYWW 140 - I'm getting good at this!

Morning!

Well it was an early wake up for me this morning - my son woke me at 4am to say there was something happening the back of our terraced houses. I looked out to see thick smoke, sparks flying and an orange glow. Yes, there was a fire - one of the neighbour's cars 7 doors down was on fire, possibly deliberately caused! Fire men were on the scene quickly, as the fire was threatening to spread through the wooden fences and sheds that surround that area.  Thankfully no one was hurt.  There is a lot of damage, but it's only cars, fences and sheds at the end of the day.

I'm so tired so may be slower in getting around to you all but I promise I will do so!

Okay my desk, it's at the mid project stage, I even resisted the urge to throw away the wipe and dirty kitchen roll to show you I do make a mess...well only a bit! I'm like this anyway, everything has it's place....lol


This is how I left it last night, and so this is what greeted me this morning. My first job after taking the pics though was to throw away the dirty wipe and kitchen roll! My dad is going to be 60 next week so I wanted to create a special card for him. I've already chosen the cottage from the Sheena Douglas stamp range. I had the idea to stamp onto acetate an over laying effect, but I'm not so sure I like it, so I make re-think. I may even be brave and do some masking perhaps putting some flowers from the paint fusion range in the foreground of the cottage.  I'm going to use tones of greys, colouring with my fabulous Spectrum Noirs, then just add a splash of colour. Not decided what yet!

Those of you who have visited me over the last weeks will know about my button collection...well you'll now see I have 3 jars on my desk. Many of you suggested Ikea but my nearest is in Bristol, and I rarely visit the town centre, the only time I go to Bristol is for the football!  My parents are keen chutney and sauce lovers so mum is saving her jars for my buttons. A bit of recycling!

Hope you all enjoy today, I shall be popping by your desks over the next few days. If you are wondering what am I going about pop over to Julia's blog , our fabulous host to see and start nosing for yourself!

Take care. Zo x

Tuesday, 7 February 2012

More colouring fun - blond & brown

Good morning, how are we?

Well the chaos has started, well hopefully as I'm scheduling this, so I'm hoping the kitchen units turned up on Monday and as you are reading this, the man should be busy ripping out the old kitchen! I've taken before shots and will take pictures during the whole process and blog once all is finished so you can all see the old, during and new kitchen!

Right at the weekend I started a little colouring project using my Spectrum Noirs.  On Sunday I shared my findings with skin tones and red hair. Today, I'm sharing my findings with blond and normal brown hair with the skin tones.

So blond hair, I used

Here's the group shot of blond haired Tilda's.
 And here's the individual pictures showing the different skin tones working (or not!) with the blond hair.


It's funny how changing the skin tone can really change the image, some look so much nicer than others and I'm sure this will change depending on the colour of clothes too.

OK now here's the brown hair, I went for a mid brown, but of course, you change it by using more or less of the lighter or darker colours to get different shades of brown.

I used this combination


And here's the group and individual pictures of Tilda with brown hair.


I'm really enjoying this little project, not only is it helping me to understand colouring hair and skin tones but it's helping me to choose better options so that my characters will look healthier and more realistic.

I'm playing with dark brown and a golden brown next. Will share them later in the week.

Thanks for popping by, take care Zo xx

Monday, 6 February 2012

Another Crafty Boots Challenge!

Well it's that time again when Crafty Boots launches its next challenge. This time the theme is Valentines! So I want to see all of your lovey dovey cards and projects.

Now I wanted to try to do something a little different so my first card is a Humphrey's Corner stamp that I coloured with a mixture of Promarkers and Spectrum Noirs.

While the papers and embellishments are from the Strawberry Kisses CD Rom. I went with blue as the dominating colour as I thought this could be given to anyone, male or female.

And then I got a bit carried away and came up with another card


This time the stamp is from the Strawberry Kisses range, coloured as above, the paper was in my stash and the rose is made using Spellbinders dies with Core-dinations card.  Think this one is a bit more traditional.

I think both cards could be used for Valentines, but I also think they would work equally well too for Anniversary cards.

I look forward to seeing your entries for our challenge, and thank you all for your kind words and participation.

Take care Zo x

Sunday, 5 February 2012

Redhead & skin tones - Spectrum Noirs

Well hello, on this fine and snow-free afternoon. Can't quite believe it snowed all afternoon yesterday but now the warmer temperature and rain has literally washed it all away.

Anyway I've been playing with my Speccies - something I've wanted to do for ages is to produce a 'key' if you like for skin tones and hair colours so that I have a reference. I spend ages playing around trying to work it out each time so I thought I'd finally sit down and come up with something permanent.

So today I'm sharing my version of skin tones with red hair.

To create the red hair I used
 Here's a group shot of each skin tone with red hair
I came up with 5 skin tones, from very pale to golden and variations in between. So here is a closer look at each with red hair.                   
.


As you can see there are certain skin tones that work with the red hair and some that clearly don't! I've wrote the numbers of the Speccies on each for the skin tone blends I used.

My personal preference is to start with the light tone first all over the face, then I go round the fringe and cheeks with the next then I only dot the darkest round the fringe and on the cheeks.  Then I use small circular motion and blend them together with either the lightest or the second lightest depending on the look I want to achieve. Sometimes you can't use the first colour on top as it bleaches the colour too much when working with darker colours. But it's fine when using only 2 colours.

I do the same with the hair - start with the lightest all over and then add the darker layers always leaving more of a space to let the lighter colours come through.

I hope this is of interest to you - I like doing silly things like this, but do find it helpful for future reference!

In posting this I realised I should have taken pictures at each step of the red hair & skin but to be fair we would be here all day and it's the overall affect I wanted to share most.

Right I'm off to play with more hair colours - I've got blond, medium brown, golden brown and dark brown to try with each skin tone!

Take care Zo xx


Thursday, 2 February 2012

Excited, kitchen and Apron!

Hmm you may wonder, what is Zoe going on about?

Well this morning I found out my new kitchen is being delivered on Monday, to be fitted next week! The reason this makes me so excited is that, at present I can only really use 2 cupboards in my kitchen, the rest are either too high for me to reach or too deep and I can't get down to reach into them. As some of you know, I have my problems, health-wise, so knowing that I'm having a kitchen designed to help me access it all is fantastic.  The cupboards will be fitted lower than normal, and the design means I will be able to use most of it.  Just got the upheaval of having the old one (which is so ancient they don't make cupboards like it any more!) ripped out and the new one put in.

I have a plan! My wonderful mum is going to come down over the weekend to clear out the kitchen and help me set up a temporary area in the back room (thankfully the back room is large).  A couple of tables to put the kettle, toaster and microwave on, so that I can still use them and my mum will cook meals for my son etc while our kitchen is out of action. During the day I only use the toaster and microwave anyway as I'm on my own. I'm looking forward to having the option of being able to put things in places that make sense!

Anyway, will share a pic or 2 as it happens!

Okay so I've covered kitchen and excited so now , here's the apron!

It's a card I've made for a family friend to give her husband on his 65th.  I wanted something different so attempted to make an apron design using Centura pearl card for the base and Core-dinations for the main part.


It's not quite as big as A4 but larger than A5. I sanded the card to get the distressed look, cut a piece to add for the pocket and then printed the flower seeds and wooden stick from MCS cds, then got some good old string from the kitchen drawer to put in. I added the white stitching for effect. I used my Crop-o-dile for the holes and eyelets. Am really pleased with this and plan on making more in different colours and using different things in the pocket. Can you imagine a Crafter's Apron? lol

Take care Zo xx

Wednesday, 1 February 2012

WOYWW 139

Go me, joining in yet again, I know I promised myself that I would do so, but I didn't expect that I'd be able to join in every week so I'm doing well!

Ok here's my desk;

I have to apologise, & be honest with you all, the majority of things on my desk over the last few weeks have been DT related which is why they are partially hidden!

Last week I teased you all with a stamped image that was hidden, and things are no different this week. There's the upside down shaped card, some of you may recognise the template and design but you'll have to come back in a few weeks to see the finished card! I'm working hard to get quite a few of my Crafty Boots DT cards made so that I can have some spare time in February to make cards just because I want to, rather than needing them for anything.

The button stash is growing, I bought a couple more bags from the local haberdashery as they are still selling them cheaply.  I'm on the look out for some small glass jars to house them in properly but haven't found any yet.

Now the lovely programme at the front of my desk is actually showing my last article that I wrote for Bristol Rovers, yes that whole green page is mine! I'm working on my next article and wanted to check back and refer to what I'd written previously so I needed it at hand.  To the right of this desk is another desk that is home to my laptop, so it's handy to be able to put things on the other desk while writing.

I know I posted this yesterday but I thought I'd share it again with you WOYWW friends.  It's a card I made yesterday using my prize from Create & Craft of Dawn Bibby's flower patch kit, plus I added the Loralie fairy topper as I thought her colours went perfectly.

Right I'm off to link this over at The Stamping Ground and look forward to visiting your desks during the day. I do look at everyone's and try to comment on as many as possible.  So thanks for popping by today, say hello, I'm always so grateful for your time and comments and really enjoy getting to know you all.

Take care Zo xx