Pages

When you make a conscious choice to be happy, no one can take it away from you because no one gave it to you: you gave it to yourself.

A quote from April Green's - Bloom For Yourself Journal

Friday 31 August 2012

Colouring red hair - 2nd part of my tutorial

Hello hope this Friday finds you well.

The other day I shared my way of colouring skin using Copics so today I'm back to show you how I colour red hair - not ginger or auburn but proper bright red!

Red is usually a difficult colour to create depth and shade, it can be hard working it to get the right light but this is what I do - can't say it's the right or wrong way, just Zoe's way!

Same as the skin I work light to dark then back again. Each picture shows the pen I've just coloured so you can see what I've done.


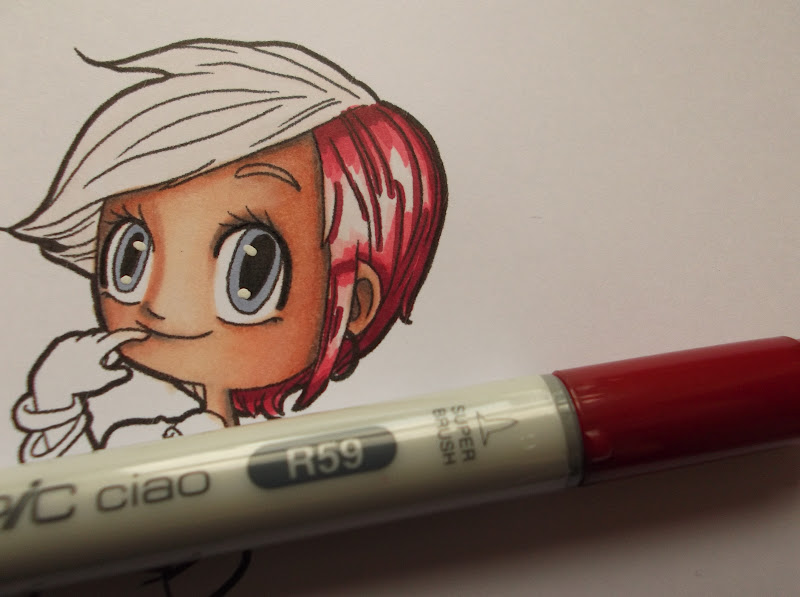
So now I've gone light to dark, now I work backwards blending.


Because of my light source this side of hair doesn't have the light on it exactly but I still want to have a slight shine to it so I colour nearly it all only leaving a small bit.


I then use E0000 to fade the red into a light area but it takes the bright whiteness away.


Then I sharpen it with the red again, so now I have a shiny bit but it's not really bright like it would be in the light.

Now for the other side, same rules apply.


This time I left a much brighter whiter shine in line with the light source that was highlighting her face and clothes.


To add further depth to the hair I used Warm Grey 7 to the areas that would be darker before going over them with the dark red to blend.


Here she is all ready - skin and hair looking fab.......well I like to think so!

Hope that helps or at least gives an insight to my way of colouring! 

Thanks so much for all the lovely comments re my colouring. So many of you have left such lovely compliments regarding my colouring that I wanted to share how I do it.

Take care Zo xx


Wednesday 29 August 2012

WOYWW 169 - colouring

Another later in the day entry from me this week! Yet another hospital appointment to keep me away from the craft room, but never mind I'm back now.

So the desk today is the same as I left it last night - 


Yesterday I posted my first colouring tutorial using Copics. I shared my way of colouring skin.  Next time I'll share how to colour that there red hair (as seen on my part coloured image) - I took pictures as I went, will post soon. 

The funny white stuff around my pens is what I have to use to help me hold them, tubing stuff that slides on and off easy. I don't care what it takes if it means I can still colour!

Top of the desk are my new digital images I just bought from Saturated Canary. I tried to resist..........really I did. But. Well. You. Know. These things happen!

Other than that it's the usual suspects that appear & get tidied away then reappear.

I suggest for far more creative (messy) desks you pop over to Julia's place where untold treasures can be found.

I'm determined to make some comments this week, I so apologise for not doing so of late, everything is mad here, with countless hospital appointments and things happening I just don't feel well enough, any quiet time sees me exhausted and resting.

Take care one and all. Zo xx

Tuesday 28 August 2012

Colouring skin tutorial with Copics - my way!

For ages now, well since I started using Copics, I've had many compliments about my colouring, and also comments suggesting I should share what I do so I decided to share my way. That is how I do it, not the taught way or even the correct way - just Zoe's way! 

So now I'll share lots of photos of each step, but really all I do is go light to dark and back again with a few tweaks once dry!

Please shout if my pics don't make sense or if you'd like to ask anything more detailed I'm more than happy to help anyone, just leave me a comment or leave me a comment to say you've emailed me if you prefer to ask me directly.

Each picture shows the pen I've just coloured with, so for example, the first photo shows E0000 lid and her face has already been coloured with E0000 to show you what it looks like each step of the way, hope that makes sense, it was the only way to show you what pen I used for each stage.


So this is the first set of light to dark, now we go backwards - 


As you can see you blend slightly into the last colour you put down. Now we do it all again, from dark to light, but this time we add real depth and shade.


This is the first time I use E13, if I used it in the earlier stages the results would be much darker, but I didn't want that effect this time so I only use it during this final stage.


Once I've done this, I add some rosy colour to her cheeks. 


Then I leave it to dry!


Once dry, it's softer but you still have the definition of your shadows.


I thought I'd share with you how I colour, as many of you know I have problems, and can't hold anything too thin, I have this tubing I bought from Complete Care. It can be used on anything to allow you to be able to hold it easier. Weird at first but it makes life so much easier.

Hope this tutorial helps. I shall be back soon with a tutorial showing how to colour her hair red!

Take care Zo xx


Monday 27 August 2012

Wow!

Just a quick hello from me - to say a huge thank you to everyone who visits my blog because I've just seen I've gone past 10,000 page views (not including my own!) Wow that's amazing. I've been a rubbish blogger again this week, things a bit mad here, too many hospital appointments (not all for me), too much other stuff to fit in around them but I did manage to have a fun filled weekend, well if lightening strikes are your thing!

Ha ha am joking, wasn't literally struck. You see I went to watch my boys, Bristol Rovers, along with Keagan and other friends and their children, on Saturday away to Wycombe Wanderers, we were winning 3 -1 before a torrential thunder and lightening storm hit and apparently our stand was hit by lightening! Health and safety man decided it was too dangerous for all to continue so abandoned said match. I shall not be going back for the re-match (oh yes original score does not stand and match has to be re-played, so very annoying!) so now have to spend ages on phone trying to get refunded! 


Here's a pic taken before the match started, full on sunshine.


Here's a pic taken as the storm started to move in!

On Sunday evening I went to the Cinema with my friend. It's been ages since I last went and I really enjoyed it, we saw The Bourne Legacy. What a great story, film and characters. Loved it. Will be re-watching the previous films now.

I'm started to put together a colouring tutorial to share on here, I've been asked about it, and have had many of you commenting on my way of colouring skin and hair etc so plan on sharing what I do.  Guess what needs recharging just as I sat down to start? Yep the camera! Forgot I took it to footy and took lots of pics. 

Daft woman!

I shall return with that hopefully some point this week.

Right hope you're enjoying the Bank Holiday. See you all soon.
Take care Zo xx

Wednesday 22 August 2012

WOYWW 168

Hello fellow WOYWW-ers and those of you who have popped by!

Firstly I need to apologise to one and all for my lack of participation lately, it's just me not working properly that's caused it, but I'm here today to join in and will try to get to some of you at least, so I do apologise if I don't get to you.

Why not pop over to Julia's to join in the fun and see other creative desks at the Top snooping place in the world!

Okay the desk -


And close up of card.


Well you can see some images printed ready to be magically created into Christmas projects of sorts along with the calendar pads.

Am thinking about making not only cards, but calendars and gift bags too this year.

Who knows I'll stick it together and see where it leads me.

Anyway I've got to supervise the sorting of my boy's bedroom today, we had a new carpet fitted yesterday so today it's all about putting everything back. If you hear screaming, that'll be me pulling my hair out, you know when menfolk don't understand simple instructions type of situation?!


Picture of nice new carpet!

Take care Zo xx

Monday 20 August 2012

Tweet Tweet - Crafty Boots

Hello new week and hello you!

I'm kind of pleased to start a new week, things didn't go to plan for me this weekend, what with my football team losing the first game and my car getting a puncture, but hey ho, that's life!

Anyway I'm here today to share with you my DT project for the latest challenge from Crafty Boots, as chosen by the lovely Amy and the theme is

Tweet Tweet

So head over to Crafty Boots and show us your cards, tags, projects all using birds somehow.

Now for me, this theme jogged my memory and allowed me to tick off my list of pages I want to include in my Smash Books. (Oh yes, I have a dedicated notebook to jot down ideas for pages I want to create in my Smash books!)

For the last few years we've had a budgie. Timmy and now Bubbles. I wanted to create a page for them so this gave me the opportunity -


I covered a page I didn't really like with Tim Holtz paper that had a bird on it, then added some Amy Tangerine ribbon. I coloured a Some Odd Girl 'Tweet' digital stamp (clear stamps can be bought from Crafty Boots on-line store) with my Copics.  I added some embellishments and a pocket which I filled with feathers that we'd collected from their cages and finally added photos of the 2 birds. The orange bird embellishments are wooden and I coloured them with my Copics so everything matched.

I hand wrote their names and dates around the page, by their photos so we'd always remember them.

So do you like birds? What projects, cards, tags etc can you come up with to join in our challenge? I can't wait to see.

Head over to the challenge blog because I've seen the rest of the DT projects and they are amazing!

Take care Zo xx


Sunday 19 August 2012

Saturated Canary Smash

Over recent months you can't help but have noticed my love of colouring - especially Saturated Canary images (and Some Odd Girl too) I've been creating pages in my Craft (black) Smash book of all my favourite crafty things.  

I've not been myself of late, not much real crafting going on, not anything to really shout about, but I have been colouring, always colouring. Some of it ends up in the bin, because I just can't make it work, but then sometimes I really surprise myself and it's so fab, well I think so, that I have to keep it, just for me, just to remind myself what I can do if I really put my mind to it. And so I finally finished my Saturated Canary page - 


Please note these aren't necessarily my favourites, they are just what I coloured and wanted to keep, I reckon I shall be making many more of these type of pages because there are too many fab images that I love to colour! 

Here's a close up of some of the characters -


Really pleased with this one - the red hair, the outfit, just love it!


Really pleased with the red skirt and blue tights - such a fab image to colour.


Red is always such a hard colour to work with but I've been practising lots!


I saw someone colour glasses with colour and thought I'd have a go. I added glossy accents to finish.


So there you go - more of my colouring!

Take care everyone - I'm slowly getting to your blogs more, I am looking at your posts even if I'm not always commenting, they cheer me up seeing all of your amazing talents. I shall be back tomorrow with my latest Crafty Boots DT project.

Zo xx