Pages

When you make a conscious choice to be happy, no one can take it away from you because no one gave it to you: you gave it to yourself.

A quote from April Green's - Bloom For Yourself Journal

Friday 30 August 2013

My 1st DT project for Polkadoodles.

Good morning - well there's a new challenge launching over at Polkadoodles and there's a super give away and an amazing prize if you win the challenge too. The theme is 2 different Fairies (or Angels), and I'm very proud to be sharing with you all my first DT project.

Those of you who have followed me for a while will know there are a few things I love - colouring and Smash books are amongst the top few so I decided to jump straight in with a double page in my craft Smash book.


To create this double page I used papers, embellishments and characters from the Bonbon Belles CD. One of the characters is pre-coloured and the other I coloured myself using a mix of markers.

Here's a close up of the pages - 


This side shows the pre-coloured character, isn't she lush?! 


This character I coloured myself. I love how all the papers and flowers work together. The sentiments are actually from Picknix CD - Welcome Home. You will find so many fab sentiment across the Polkadoodles CD's and they all easily work together.

I like to create layouts like this in my craft journal, it helps me get a feel for the products, but also gives me inspiration as I often look back through to see what I've created before.

Well I'd love to hear what you think of my 1st Polkadoodles DT project so tell me!!
Take care Zo xx


Wednesday 28 August 2013

A Witch warning!

Over the last few days I've been colouring and enjoying the new spooky Halloween range from Polkadoodles.

In particular, the new witch who I love. She is fun and funky and I can see her coloured in so many colour combos. I decided to colour her up and make a door hanging that I can put on my front door at Halloween - 


I used a mix of markers to colour the witch and chose purple-pink & gold combination. I used Dylusions alphabet stamps to stamp out the words and coloured over them in the same colours. I matted the images onto coordinating card and then onto board. I added black webbing and black and white twine to hang the project.

The main image is blown up to 7 & half inches by 5 & half inches so it took me a while to colour her but I enjoyed every minute as the image is perfect for colouring no matter your abilities.

Least the Trick or Treat-ers will know how the land lies when they come knocking!!!!! 

Take care Zo xx


Tuesday 27 August 2013

Times Flies makes with a showcase

Well I've been in a bit of a whirlwind here over the weekend, football Saturday (Bristol Rovers won!) where I caught up with friends, then I spent time colouring and making (can't share yet) and then today I met my fab friend Debs to enjoy a few hours of eating cheesecake (me) and carrot cake (Debs) and chatting away. All to celebrate Deb's birthday tomorrow. This leads me to my projects I want to finally share with you. I made them a while ago and one part has already been showcased! But I couldn't share that or the makes until Debs had received them, which she did today.

So this 3-part-present included a decorated letter 'D', a card and a board of interest. Here they are - 


So the letter - covered with the script paper from the 8 x 8 Time Flies collection paper pad. Then the flowers are from the die cut embellishments. I used Card Candi to centre the flowers however in one I used a white clay embellishment made using the Stampin'Up molds.


I added a butterfly to the top and added a Tim Holtz nib. I used Pearl paint on the edges of the letter and where the paper met.


Close up of the flowers.

Now for the card - 


I covered an elegant edged stepper card again from Craftwork cards. I used embellishments from the kit and added Candi, clay embellishments and pearls.


The board of interest was inspired by all things Debs loves, from writing to photography.


I used the Tim holts die cut film strip plus the instant photo to add film and photography. The Tim Holtz typewriter represents writing as does the script paper and the nib on the butterfly. 

Now this is the exciting bit - a few weeks ago this board was shared on the Craftwork Cards Blog as part of the FOCUS ON YOU showcase. I was so honoured and thank my fab crafty friend Emma Williams for suggesting I enter my work.

Here's a few close ups - 


Phew, lots of photos but I wanted to really share the details on these projects. Thankfully Debs loved them all and saw the thought that had gone into each piece.

Right I'm off to do some colouring while listening to the footy this evening. I'll be back soon with some Polkadoodles projects as I start sharing my DT work with you all.

Take care Zo xx


Friday 23 August 2013

Some Exciting News!

Hello everyone - I've some exciting news to share along with a card.

So the card is a little clue really as to my news, here it is - 


My friend's daughter is moving so I wanted to make a her a card to wish her good luck in her new home. I used elements from the Bonbon Belles CD Rom from Polkadoodles. I took the PNG images into Serif Craft Artist to make the card topper. I layered the backgrounds which I also used as materials so I could digitally fray the edges. Adding shadows to make each of the images pop and look 3D even though everything is actually flat. I love doing that!

So my news - Nikky has asked me to be on the Polkadoodles design team and I've accepted.  I've been a fan of Polkadoodles CD's and products for a while so I was thrilled to be asked.  I'm finding my way with the challenges etc so look out for posts linking up my projects to Polkadoodles soon. Exciting times. And lots of exciting products to come I know! 

Take care Zo xx

Wednesday 21 August 2013

WOYWW 220

Morning! Well I've been up early and out and about. I was lucky to get a cancellation with my hairdresser so I was down in town for 9AM, usually unheard of, but needs must and I needed a haircut desperately.

So now I'm back, hair all chopped and feeling lovely. A quick snap around my craft room reveals these photos - 
Left side, looking rather full. Usual suspects there but all the folders are my Family History research. About ten years ago I started and found a lot of information, but after about 4 years I stopped. Back last year I sorted the information into small folders relating to each main family group. I got it all out at the weekend and have started adding the 1911 census to the families.

New pen storage. I still need another set to house the rest of my Copics but I'll get there!

Window side - usual colouring going on!

Shelves.

Slightly crammed bookcase. 

So there you go, that's me. Why don't you pop over to Julia's - Queen of all desks to join in, and get started!
Take care Zo xx

Monday 19 August 2013

Christmas in August

Well I'm back today to share my latest Crafty Boots Challenge project. The theme chosen by the fab and talented Sandra is Christmas in August.  So you have our permission to dig out the Christmas stash and play along.

I'm trying, this year, to make Christmas projects using images that aren't actually meant for Christmas. Characters that aren't related but when coloured and matched with Christmas stash they work. Here's my gift tag I've made - 


The character is Chilling Kaylee digi stamp from Some Odd Girl. The background is created by stamping the baubles from Stampin'Up Ornament Keepsakes using Gum ball Green ink. I added red buttons and sentiments from Craftwork cards. I like the idea of Kaylee sitting so she is off the tag. I coloured her using a mix of Copics, Spectrum Noirs and Graph It markers.


So there you go. Simple really. I look forward to seeing your creations.
Take care Zo xx


Friday 16 August 2013

Wings, flowers and colour matching.

Hello everyone - the sun has decided to shine today which makes everything seem okay!

I'm back to share a card I've made using some new stamps, punch and a new Saturated Canary image. 


As you can see the image is one of Krista's new digi stamps 'Ribbons Fairy' - I coloured her using a mix of Copics, Spectrum Noir and Graph It markers.


The background is made using an Anna Griffin embossing folder which I ran through my Ebosser. Using the Wisteria Wonder colour card from Stampin'Up.


The flowers are from Stampin'Up 'Flower shop' stamp set and were stamped using coordinating inks to match the image.


Card Candi and Stickles make great accents!


The sentiment is from another Stampin'Up set called Chalk Talk. I buy all my Stampin'Up products from Stephanie-Emma - SU demo and a lovely lady!

This card is one of those 'I need to play' makes. But when I saw the new Saturated Canary challenge of 'Winged Things'  I knew it would fit so I'm going to enter it.

That's me for today, I'm off to play some more with my new stamps and I have piles of digi images all ready to colour!
Take care Zo xx


Wednesday 14 August 2013

WOYWW 219

Morning - well it is just. I had a lie in! 

So my photos are quick and flash assisted as it's grey and damp here this morning. But still warm-ish. Right I'll get on, as always go over to Julia's and join in, link up or just plain old nose your way around the world of desks.

Here's mine - 


Ok right side, the fan is now off the desk but still there, cos it does get warm in here! There is a huge pile of pens waiting to be put away as I've finished with them for now.


Window side, Project Life album out as I've created some pages but need to do the journalling.


Those green disc things - people keep asking what they are. They are Epiphany tools. Punches that also can make Epoxy type shaped embellishments.


A Baxter page! Some journalling done but I need to embellish.


I need to journal and embellish this page.

Right I'll finish off with a new photo of me and my boy, Keagan. It was taken on Sunday. It was my parent's 40th Wedding anniversary and we all went out for Sunday lunch, but beforehand we had a family photo session!


Take care, I'll be back and visiting over the next few days.
Zo xx

Wednesday 7 August 2013

WOYWW 218

Well today is Baxter's 8th birthday so I thought it was only fitting to share with you a rather cute picture of him chilling out in his hidey (under the snooker table!) - 


Bless him, he is starting to look quite distinguished with flecks of grey appearing throughout his coat!

Right desk, I best get on with it otherwise Queen Julia of desk (where you need to go to link up) will be telling me off. Bit boring and normal for me, as in it's the same as most weeks! - 


Check out my new piece of colouring on my wall!


Radio - check. Fan - check. Pens - check. Colouring - check!

Right I wish you all a good day, going to get a few chores done then grab a coffee and return here to have a nose at your desks!
Take care Zo xx


Monday 5 August 2013

Die Cuts - Crafty Boots

Morning! 

A bit grey & damp here, but who cares? Time in the craft room isn't controlled by the weather, well unless it's too hot I suppose!

This fortnight's challenge at Crafty Boots is - Die Cuts set by Helen L, so it's simply as long as you use a die cut then you can join in. I wonder if anyone will go full out and use as many as possible or will you keep it clean and simple .........like me! Here's my project - 


An elegant shaped card topped with the film die cut using Tim Holtz die through my Ebosser.  The image is a Some Odd Girl digital stamp.  I added the sentiment and hand dotted the dots around the detail edges.


So there you go die cuts as simple accents but I feel in this instances they add depth and wow to a CAS card.

Hope you join in and have fun.
Take care Zo xx

Saturday 3 August 2013

Some Odd Girl - sorting my images

Eeek I'm a little excited and have butterflies in my tum. The football season starts today, in less than 15 mins in fact for my boys - Bristol Rovers!  They are away so I'm listening to the commentary, but I still get that first day nerves and excitement.

Right anyway back to why I'm here, I want to share 2 projects I have been working on for a little while. the type of projects that you want to do but they take time. The first is a reference book/index of all my Some Odd Girl stamps and digi images. I have lots and find it can be tiresome to look through on the laptop so I've created this book that can be added to. I will in time colour all the images but for now I'm pleased with how it's turned out - 


As you can see I've embossed an A4 piece of card using a folder through my Ebosser. I sanded it and layered it on to some white card then onto the yellow base.  I added die cuts and chose some of my favourite characters. I added Thickers to spell out the SOG name. You'll see I've coloured the football one in Bristol Rovers colours!!


Then I've created this digital scene using digi images to create the background. All done in Serif Craft Artist Pro 2 I then added the digi SOG stamps, resizing them to create perspective. I then printed it off and coloured each fairy/image using a mix of Copics/Spectrum Noirs/Graph It markers. I wanted to do this to go on my wall.

Hope you all like what I've done.
Take care Zo xx

Thursday 1 August 2013

My Project Life

As many of you know I'm a huge fan of Smash books, in fact I am dedicating one to the whole of 2013, recording each week, using photos, receipts and stuff as I go. I've never been a Scrap-booker, I've made a few layouts digitally and paper, but not got in to it really. I've often seen people doing Project Life. A weekly peek into their lives with everything but it's less fuss.  Part of my Smash 2013 was inspired by this idea.  So recently I looked into PL a bit more and found it to be more than I thought. It is not meant to record anything  specific, nor is it meant to be the weekly thing I thought, more like it's up to you to record everything you wish, weekly, yearly or in no order at all. 

Create & Craft recently had a PL bundle at a great price and I couldn't resist. As seen on my desk yesterday it's a huge bundle of stuff - 

So once I had a look through I decided I wanted to start, but wasn't sure so I followed the suggested first and last pages using the pre-printed cards and following the easy to follow pictures!

So it suggested you put the empty page folders in. I had 10 of each design so I set about putting them in so there was a random order to the designs.

Inside the box there are pictorial examples so I followed the directions and set my first and last page to match.

First page.

Here you can see the reverse of the cards with suggestions to their positions which I followed.
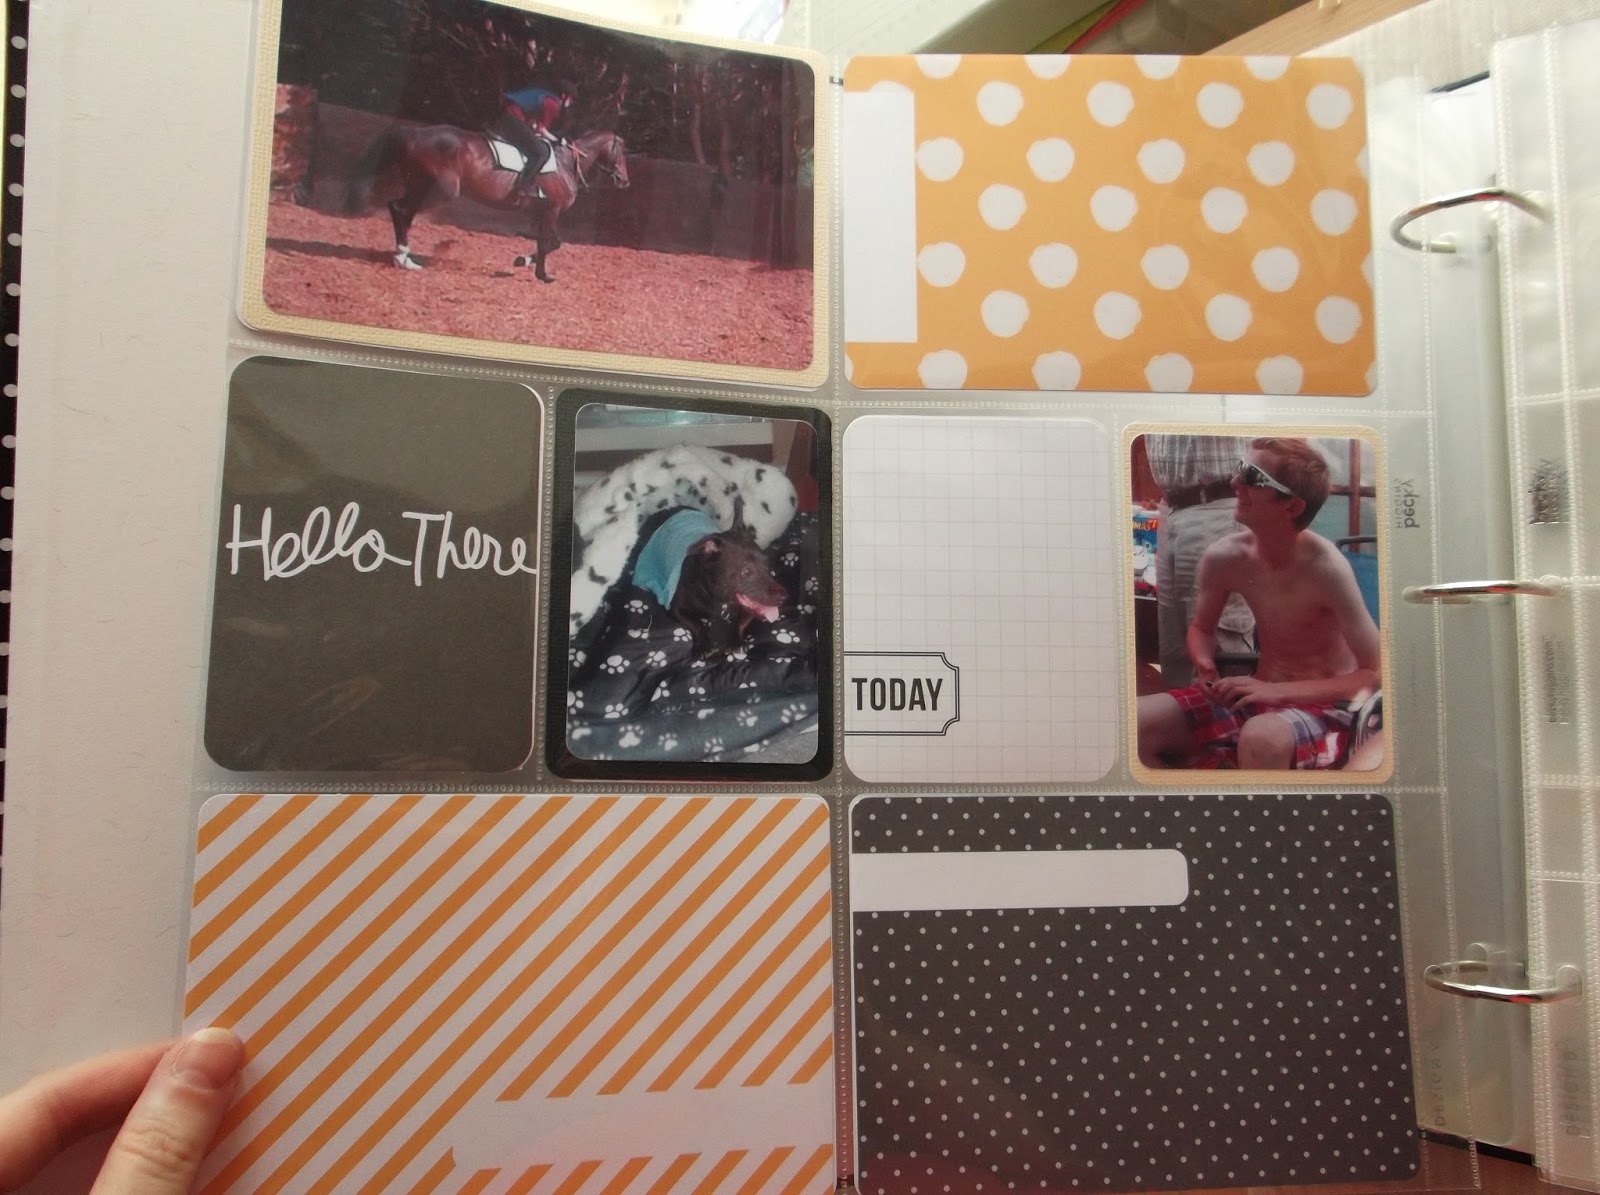
Last page.


My album - nice and dotty!

Then I started to personalise my first page, including a photo of me I took on my phone.


I added the date as I think that is important. We always forget in the end!

This is the box of cards that you use to fill the pages. They slip easily into the slots and are a real mix of designs and are double sided so you have a great choice.

This is the back of my first page - I wanted it to reflect now, the present so I've included recent photos of Keagan and Baxter. I've yet to write my journalling which I will do so on Today card. 

As well as the album, pages, cards there were dividers, papers and these packets of coordinating card stock that I can matt my photos on to.

Overall I think it is a great kit. Good quality and easy to use. The storage for the cards etc is fab and it makes it easy to keep on a shelf etc. My plan is to create pages for different memories. In no order. Just whatever I fancy. My idea is to fill it up so that it can be kept out on the coffee table where it can be seen, flicked through and added to. I want to get those photos off the computer and out where we can see them.  Oh it will take me ages but I know I will enjoy it. It's stylish, the layouts are fun and fab and can be embellished but I'm not scared to do so. Not a like a scrapbook layout which scares me a lot!! 

Take care Zo xx