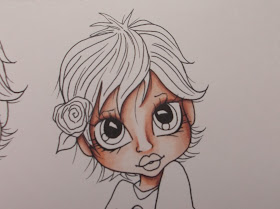
Morning - I have created a Tutorial page so I can share my colouring steps/tutorials/ideas/colours with you all. By having a page the information is there and not lost between other posts, but I do plan on putting the latest tutorial into a post like I am today, as I'm sharing the skin tutorial I posted to the page yesterday. So, you, my readers, will see it and know I've posted as I'm not sure any additions to the page will show up in your readers. Despite the need to duplicate I do like having the page so that it's there for reference for anyone who wants to look more than once.
So here's the first tutorial copied over -
Colouring with depth & shadow
So over the next week or so I'm going to show you how I colour an image from scratch. I will show you the pens I use & the steps I take with photos taken at each stage.
One - Skin
One - Skin
So today (13/06/13) I'm going to show you the skin. I always start with the skin followed by the hair as these are the two areas that if you are going to make a mistake it usually happens here. Plus it can take a long time to colour the clothes depending on the image. So you don't want to spend hours colouring an outfit only to mess up the skin & hair!
So here we go, I'm colouring a Saturated Canary digi image 'Boobie' using my Copics.
So these are my colours I use for skin, I may vary it, but these are my 'go to' colours. E0000, E000, E11, E04 & BV23.
I start by lightly adding BV23 to the areas that are going to be the darkest.
Then I go over it with E04.
Then I use E11 to blend the 2 previous and to start planning out areas like the nose.
I then use E000 to blend over all of it except the very darkest area and the most lightest areas.
Then I go over the lightest area with E0000 blending into the E000.
At this stage I leave the image to dry. It doesn't take long but I will go off and make a cup of tea or do something else for a bit so that it's totally dry as my next step is to add to the layers and start building up more depth. I say this first layer is like a map, it plans out the areas of light and dark. I usually colour faces with the light shining from the front, but slightly to one side to pick up the shape of the nose.
Once I'm happy it's dry I start the process again, but I this time I leave out the BV23 and start with E04.
As you can see I'm going over the dark areas again.
Then E11 mapping out the areas of shadow once again.
E000 softens it all but as you can see I haven't blended over the darker areas as much this time.
Finishing once again with E0000 making sure I soften areas while keeping the definition of the shadows.
Now I add warmth to the cheeks using R20.
I soften the edges of the R20 with E000 so that it blends into the face.
I then use the E04 & R20 to colour the lips.
In reality the darkness of the BV23 & E04 can look quite harsh, but once you start colouring the hair and clothes the face softens and sometimes I find I even have to go back and darken some of the shadows. Of course, this depends on the hair colour and the clothes. Next time I will show you how I colour the hair.
SO there you go, my first of many tutorials. I know many of you have asked me to do this so I hope you find it helpful. Please don't be afraid to ask any questions, if there's anything specific you want to see, tell me!! I'm planning on colouring many different characters - some easier than others, some with detailed clothing or hair etc.
Take care Zo xx


WOW!!! This is a really fabulous tutorial Zo, thank you so much. Your colouring is amazing. I will be back!!!!
ReplyDeleteSue xx
Fantastic tutorial. Thanks so much for this.
ReplyDeletebrilliant thank you!
ReplyDeleteLooks fabulous! Thanks for sharing! Hugs, Elizabeth xx
ReplyDelete