Pages

Sunday 30 June 2013

My colouring this weekend

Well I've been working on this image most weekend, 2 attempts to get this picture that I'm pretty darned pleased with. It's for my friend's little girl to go on her birthday card. She loves Disney princesses so had to do this to look like Ariel, The Little Mermaid.

The image is Mermaid from Saturated Canary and is coloured with Copics & Spectrum Noirs. Excuse the fact that the Glossy accents is still wet!!


The tail is coloured using a dotted effect, I saw this done by Alyce Keegan (Kit & Clowder) in a recent video tutorial. 

Anyway I thought I'd share it with you all. Don't forget the blog world will end tomorrow (ha ha) and you will disappear or at least blogs will from Google reader. I hope you will follow me over on Bloglovin' click the flashing Eiffel Tower to be taken to my blog over there.

Take care Zo xx

Bloglovin'

Hi just a quick note to say I have signed up to Bloglovin' so that I can continue to follow you all after tomorrow. Please click the flashing Eiffel Tower to take you to my blog over there!! 

Take care Zo xx

Wednesday 26 June 2013

WOYWW 213 - New things!

Right I'm here, I haven't done any jobs yet, cos well, this is more important.....right?

Okay desk hopping/dashing/nosing whatever you call it can be officially started at Julia's desk where you can link up and be prepared to be whisked around the world to see the sights of stash galore!

Mine, those eagle eyed amongst you will be able to spot some differences this week, let me know what you see that's new/different. No prizes, just seeing how nosey you lot really are!!

So right side - 


Can you tell the difference & spot anything new?

Window side - 


There's piles of paper in the window as I was going to make cards you see, but I loved my colouring too much and decided to keep it for myself so made a page in my Black craft Smash book!


Here it is up close - Bamboo in a shoe. Oh I love this stamp. As you can see I kept the same colours, but changed them around. If I could wear heels I would wear them all!!


Due to any differences/newness going on in my room I had to have a move around so my tall ribbon tower is now on top the bookcase. Can see anything else different with the shelves, anything additions? 

Well it's been lovely to see you, hope you enjoyed my little game of 'Spot the Difference' I look forward to reading your observations!!!

Edit: will give you a clue - Ebosser!! 

Take care Zo xx


Monday 24 June 2013

Anything but Square!

Hello Monday and hello you, my lovely reader!

Today I'm back to share my DT creation for Crafty Boots and the theme chosen by the lovely Faye is

Anything but Square

so as it suggests show us your creations that are anything but square!

My make is an elegant edged shaped card that I made for my friend's little boy who was 6. I wanted to show that you can use these shapes that may seem more feminine for boys just as easy if you use the right papers and embellishments.


The Saturated Canary image was coloured using a mix of Copics and Spectrum Noir markers.


I used corrugated card, W tile and the June calendar embellishment from my stash. The papers were My Mind's Eye Dilly Dally collection. I added Washi tape and a sentiment.

Hope you like my creation and I look forward to seeing yours over on the challenge blog!
Take care Zo xx


Friday 21 June 2013

Colouring Hair

Good afternoon!

I'm back today to share the latest addition to my tutorials page - hair colouring. And I mean colouring the hair of an image with Copics, not colouring my own hair!!! 

So here it is - 

Two - Hair

So today (21/06/13) I'm going to continue my colouring of the Saturated Canary image 'Boobie'. You'll see below I have already coloured the skin so now I'll share how I colour the hair. I've taken photos of colouring one side to show the technique which is similar to the skin to be fair as I use the same rules no matter what I'm colouring.


So these are the colours I'm going to use.  I usually work with 5 colours for the hair but it can be 5 of whatever colour you choose as long as you get a good range from light to dark to get that real depth of shade.


I start with the very lightest to map out my shadows.


Going over it with the next shade.


Then the next but now I start to make individual strands by flicking the nib.


It's hard to describe how or why I do each stage it's just what comes to me. It's all about building layers.


Up to this point I'm just laying down colour and planning where my light source will hit but now I'm going to start creating the hair strands as I work back to the lightest colour.


As you can see I'm flicking more into the lighter areas now.


Working back down the colour shades flicking to create the strands.


This shade brings out the real shine and warmth but I'm careful not to cover the white completely.


I use the very lightest to go over the rest apart from the very darkest areas, this as you can see tones down the colours, blending the layers. I now leave this to dry completely. At this stage I'm happy with my planning of where the light and dark areas are and will continue flicking to create strands once this is dry.


Once dry I add more gold to the lighter areas.


Then I skip shades to the 2nd darkest to add clearly defined strands.


Then I add a few more darker strands.  You'll notice I don't use all of the colours at this point I want it to look like hair with singles strands. If I used all the colours again I would lose the definition.


I repeat all of the above stages on the opposite side to complete the hair. You'll now see that the skin doesn't look as harsh and looks paler than it did before!

I never colour hair in one go, I always break it up into sections. This allows me to work and blend properly. If I tried to colour the hair in one go some areas would have dried by the time I got back to them so the initial blending and layers wouldn't be as effective. Even on short hair I work in sections. 

As you can see my techniques for colouring doesn't change too much no matter what I colour. Obviously hair needs to be a bit more defined rather than being fully blended like the skin did.

So I hope that makes sense and helps a little to understand how I colour!

Take care Zo xx

Wednesday 19 June 2013

WOYWW 211

Morning!

Desk dashers should dash over to Julia's to link up and join in, or just to see what on Earth this is all about & why!!

Okay my desk -


An ever growing pile of stamps including my new Dylusions & Tim Holtz purchases. Those beady eyes of some of you may spot a few more Copic sketch markers in my collection. Yep I needed a new colour combo ( you'll see it when I do my hair colouring tutorial).


Beautiful sunshine!


Window side is in-between I guess, a few things on the window sill ready & waiting and then last night I decided to finish off the page in my art journal. A new thing for me really. But I'm liking the freedom and gives a chance to get inky and messy if I choose. This finished page was inspired by a video Dyan from Dylusions did a while ago using black and white.

Anyway that's me showing my space this week. While you are here may I point out I've finally got myself in gear and have responded to many of you all asking me to do tutorials. So now there's a dedicated page for my tutorials, so they are easy to find but I will post them too so people will know when a new one appears!!

Take care Zo xx

Friday 14 June 2013

Skin colouring Tutorial

Morning - I have created a Tutorial page so I can share my colouring steps/tutorials/ideas/colours with you all. By having a page the information is there and not lost between other posts, but I do plan on putting the latest tutorial into a post like I am today, as I'm sharing the skin tutorial I posted to the page yesterday. So, you, my readers, will see it and know I've posted as I'm not sure any additions to the page will show up in your readers. Despite the need to duplicate I do like having the page so that it's there for reference for anyone who wants to look more than once.

So here's the first tutorial copied over - 

Colouring with depth & shadow

So over the next week or so I'm going to show you how I colour an image from scratch. I will show you the pens I use & the steps I take with photos taken at each stage.

One - Skin
So today (13/06/13) I'm going to show you the skin. I always start with the skin followed by the hair as these are the two areas that if you are going to make a mistake it usually happens here. Plus it can take a long time to colour the clothes depending on the image. So you don't want to spend hours colouring an outfit only to mess up the skin & hair!

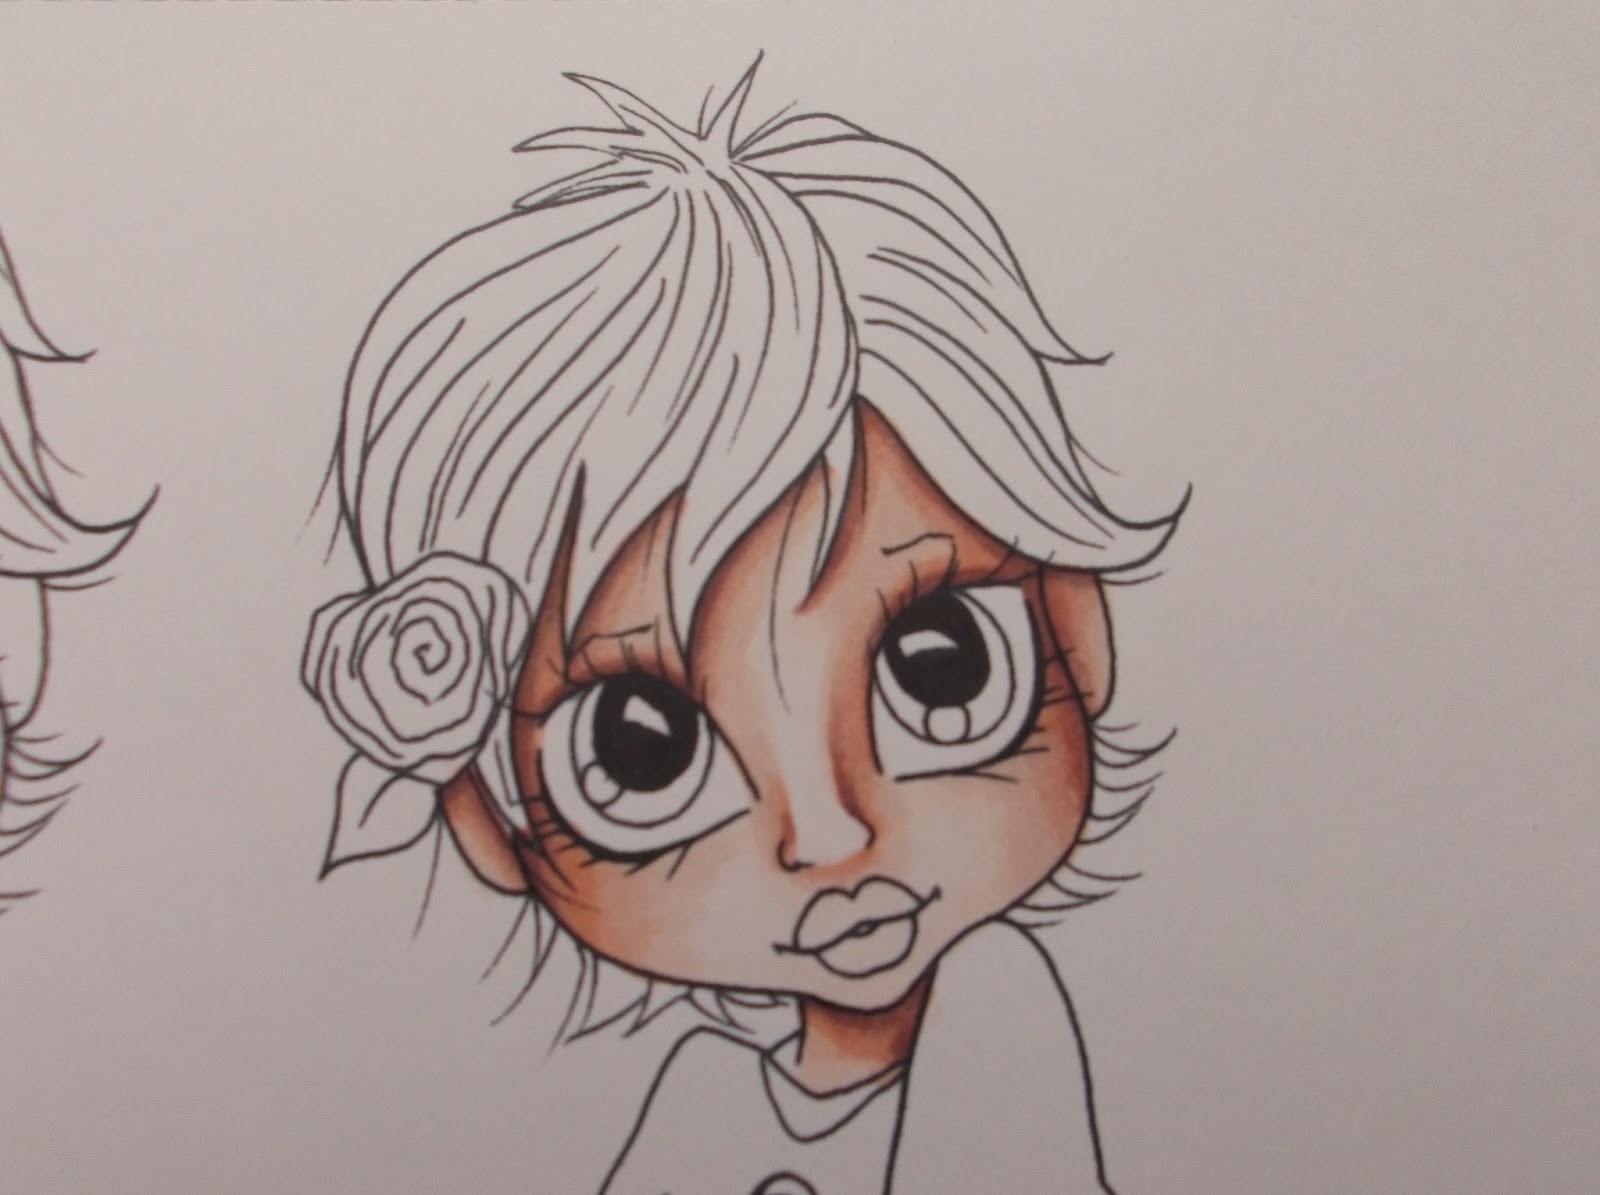
So here we go, I'm colouring a Saturated Canary digi image 'Boobie' using my Copics. 


So these are my colours I use for skin, I may vary it, but these are my 'go to' colours. E0000, E000, E11, E04 & BV23.


I start by lightly adding BV23 to the areas that are going to be the darkest.


Then I go over it with E04.


Then I use E11 to blend the 2 previous and to start planning out areas like the nose.


I then use E000 to blend over all of it except the very darkest area and the most lightest areas.


Then I go over the lightest area with E0000 blending into the E000.

At this stage I leave the image to dry. It doesn't take long but I will go off and make a cup of tea or do something else for a bit so that it's totally dry as my next step is to add to the layers and start building up more depth. I say this first layer is like a map, it plans out the areas of light and dark. I usually colour faces with the light shining from the front, but slightly to one side to pick up the shape of the nose. 

Once I'm happy it's dry I start the process again, but I this time I leave out the BV23 and start with E04.

As you can see I'm going over the dark areas again.


Then E11 mapping out the areas of shadow once again.


E000 softens it all but as you can see I haven't blended over the darker areas as much this time.


Finishing once again with E0000 making sure I soften areas while keeping the definition of the shadows.


Now I add warmth to the cheeks using R20.


I soften the edges of the R20 with E000 so that it blends into the face.


I then use the E04 & R20 to colour the lips.

In reality the darkness of the BV23 & E04 can look quite harsh, but once you start colouring the hair and clothes the face softens and sometimes I find I even have to go back and darken some of the shadows. Of course, this depends on the hair colour and the clothes. Next time I will show you how I colour the hair. 

SO there you go, my first of many tutorials. I know many of you have asked me to do this so I hope you find it helpful. Please don't be afraid to ask any questions, if there's anything specific you want to see, tell me!! I'm planning on colouring many different characters - some easier than others, some with detailed clothing or hair etc.

Take care Zo xx

Wednesday 12 June 2013

WOYWW 210

Cor blimey I am early! Well for me. Keagan is off to Edgbaston today to watch Australia v New Zealand in the ICC Champions Trophy (cricket) on a school trip so we are up early.

So here's my early morning desk - 


So on the working bit of the desk there is a couple of images and a shaped card that I can't share yet!


Now this is definitely turning into a mess which I plan to sort today. Those G45 papers are part of the shaped card creation.


My bin area probably at its tidiest!

So that's it for me, once Keagan has set off I shall return to bed, but I will be back later, coffee in hand, to come visiting. So now pop over the Julia's our wonderfully kind queen of all things desk sharing to link up and join in.

Oh before I go I thought I'd share this photo with you just to confirm just how mad and random I really am. Those of you who have met me will understand I am sure!!


Yep Baxter has his own Bristol Rovers hoodie!

Take care Zo xx

Tuesday 11 June 2013

A peek at my DT Make for Crafty Boots

Morning - horrible wet and grey here, but still, perfect crafting weather!

Today I'm here to ask you pop over to the Crafty Boots shop blog to see my latest DT creation. Here's a peek - 


I'd love to hear what you think, either here or over on the blog where you can see the whole creation, here's the link - Crafty Boots blog.

Take care and enjoy your day! Zo xx

Monday 10 June 2013

Crafty Boots - Pink Butterfly

Good morning everyone, well I'm back today to share with you my DT creation for Crafty Boots challenge blog where the theme for this fortnight is -

PINK BUTTERFLY

as chosen by the fab Emma T.

For me, there was only one image I was going to use and that is Saturated Canary 'Butterflies', kind of an obvious choice really!


I used a 6.5 x 6.5 inch card base which I made myself then I matted and layered paper & silver mirror card. The image is coloured using Copics. The butterfly is an old punch I have.


Had to add sparkle!


I'm particularly happy with my colouring of this image.  For her dress I used RV63, 66 & 69, but to get the real depth in the folds I also added E49 which is a dark brown. Browns are really good for adding depth to pinks, reds etc.

Those of you who often ask about my colouring will perhaps be pleased to know I am going to add a tutorial page to my blog and will start to add photo based tutorials from simple basic colouring to more in depth tutorials. Obviously this will take time to prepare, but I will do my best!

Now pop over to the challenge blog and join in the fun! 
Take care Zo xx


Wednesday 5 June 2013

WOYWW 209

Hello Wednesday and hello everyone!!

Boy did I enjoy our WOYWW crop on Saturday, so lovely to see everyone again and to meet a few new faces too.

I've had to have a few quiet days, was so tired Sun, I was wobbly & had a fall Monday, but fell on the loo so I didn't fall too far, then yesterday my neck was in spasms! BUT it was all worth it to have such a lovely fun, food, hug filled day with a spot of crafting thrown in too!! If you want to see my photos of the day you can HERE.

Right my desk, now to be fair I feel it is a mess, well for me it is, but I resisted tidying and took it as is -


The right side is very messy, untidy and needs sorting!


It's less messy in front of the window as this is where I work. I'm in the middle of making a card and have some DT projects to make so there are a few pens laying around and stamps too.


In our fab goody bags that we were given on Saturday, there was a bag of stash with the instruction to make then post. So this is my card. I cut the paper into squares that about 4.5 cm then I went around them with a black pen. I arranged them onto the 6 x 4 card blank. I stuck them using glue gel and raised some higher than others. Once dry I popped some black Card Candi onto the script squares. That's it. Simple. 

Thanks again to Julia and Jan for such a fab day, and to carry on the desk dashing (gaining inspiration) tradition pop over to the Stamping Ground to link up, join in and desk dash away!

Take care Zo xx